The Ponseti Clubfoot Brace: Tips for Parents
Article Translations: (Spanish)
Correcting your child's clubfoot begins with a series of casts and ends with a brace.
After the foot's position is corrected in the casting phase, it must be maintained in the bracing phase for up to 5 years. The Ponseti clubfoot brace keeps the corrected foot growing like it should. If the brace isn't worn as directed, a corrected clubfoot will return to its original position (this is called a relapse).
Putting the Shoes On
The orthopedic care team will teach you how to put on your baby's shoes and then attach them to the brace. First, they'll show you how to apply the braces on a baby doll model during the casting phase. That way, you'll be ready to apply the brace to your baby after their feet are corrected. Older kids and other family members also might want to learn how to do this.
It's important to be sure your baby's feet are positioned correctly in the shoes or boots. Here's how:
- First, put soft, thin cotton socks (avoid terrycloth or other thick material) on your baby. Make sure the socks fit snugly (no wrinkles or sags) and are long enough to go above the top of the shoe. Some people use socks that have a little extra grip on the bottom.
- Open all the flaps of the shoe and move them and the straps out of the way.
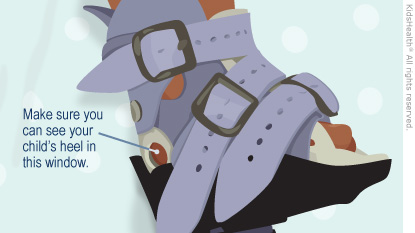
- Slide your child's foot into the shoe, making sure the heel is all the way down and at the back of the shoe. Press down with your thumb to keep the foot in place.
- Holding the foot securely in the shoe, put the shoe's tongue over the middle of the foot.
- Always tighten the middle strap first. It should be snug enough that you can't wiggle the foot.
- Then, tighten the top strap over the ankle, followed by the third strap near the toes. It can help to mark the hole on each strap so you know exactly where to buckle it. The soft leather may stretch over time.

As the care team showed you, look through the holes in the back of the shoe to make sure that the heels are all the way down and back. You should not be able to wiggle the feet in the shoes.
Attaching and Detaching the Bar
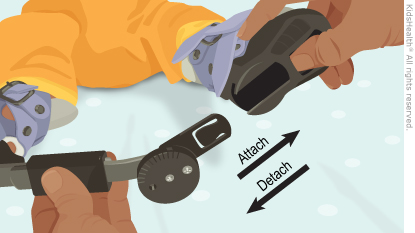
When both shoes are on, attach the bar. The shoes alone won't keep your child's feet in place — they need to be connected to the bar to stay corrected.
On the bottom of the bar, look for an R and an L for your child's right foot and left foot. Numbers on the bottom of the bar tell you how far your child's feet are turned out when in the brace. Your doctor will prescribe the correct angle for your child's feet, but usually a clubfoot will face out at 60 degrees and a non-clubfoot will be placed at 30 degrees.

Slide the bar into the groove in the bottom of the shoes and click into place.
To take the bar off the shoes, just press on the tab that says "Push" while gently pulling the bar out. Take the bar off before removing the shoes.
Note: All information is for educational purposes only. For specific medical advice, diagnoses, and treatment, consult your doctor.
© 1995-2024 KidsHealth ® All rights reserved. Images provided by iStock, Getty Images, Corbis, Veer, Science Photo Library, Science Source Images, Shutterstock, and Clipart.com

