Central Line (Tunneled): Care at home
Article Translations: (Spanish) (Somali)
Your child will be going home with a central line. You will learn how to use and care for the line, which will include ways to prevent infection, flushing, changing the cap and dressing, and solving problems.
Your child's central line:
A central line (tunneled) catheter is a thin tube inserted into a large vein that goes to the heart. The type your child has is a:
___ Broviac™ ___ One lumen
___ Hickman™ ___ Two lumen
___ Medcomp® ___ Power injectable
___ Other:
What is the central line like?
The part of the central line under the skin has a small Dacron™ cuff. Tissue grows into this cuff area. The cuff acts as an anchor to help prevent movement of the central line. This process takes at least two weeks or more.
How should I care for my child?
As your child improves and is able to be at home, nurses will help you become comfortable with the central line and teach you how to care for your child’s line before you do them yourself. The hospital staff will lead and supervise line cares any time your child is in the hospital.
These are the things you will need to learn before going home:
- preventing infection
- giving medicine
- flushing the central line
- changing the injection cap
- changing the dressing
- solving problems
- knowing when and who to call for help
Preventing Infection
Central lines are helpful for taking care of your child, but they can increase the risk of infections when bacteria grow in the catheter and travel to the bloodstream. This is called a Central Line Associated Blood Stream Infection or CLABSI. A CLABSI can be serious and life threatening.
It is very important to prevent infection, or the catheter may need to be removed.
There are things you can do to prevent a central line infection.
Cleanliness is a must!
- Clean your hands with alcohol-based sanitizer or wash with soap and water before caring for your child's central line. This means washing your hands before doing any of these things:
- Flushing the central line, giving medication, changing the cap, changing the dressing, and any time handling the central line.
- Clean solid surface work areas with a disinfectant (such as Lysol® or another brand) when preparing to do central line cares.
- Keep the central line out of the diaper area when changing the diaper, and do not allow your child to put the catheter in their mouth.
- Look at the central line site and look for signs of infection (see Solving Problems).
Can my child bathe/shower?
Once your doctor or nurse approves bathing and showering, take care and protect the line by protecting the dressing and lines with a waterproof covering. If the dressing becomes wet, replace it right away.
Do not let the catheter lines drop down into the water, as germs from the water may enter the catheter. Do not bathe in hot tubs.
Can my child go swimming?
While your child has a central line, swimming in oceans, lakes, rivers, pools, and hot tubs is discouraged. There have been reports of serious infections after swimming. There may be times when your provider and you as caregivers would allow it but it should be discussed with your medical team. If the decision is made to allow swimming, the catheter and lines should be covered with a waterproof covering. The dressing and caps should be changed immediately after coming out of the water.
Flushing the Central Line
When should I flush the central line?
The central line must be flushed to help prevent blood from (building up) and blocking it. If the catheter becomes blocked, it may have to be removed.
When IV fluids are running through the central line, it is being flushed continuously. When the central line is not being used, it must be flushed at these times:
- Before and after infusing medicine(s) or fluids.
- After drawing blood.
- If your child weighs over 17 pounds, flush the line every 24 hours.
- If your child weighs under 17 pounds, flush the line every 12 hours each day.
How do I flush the central line?
Important notes about flushing
- Always use 10mL or larger syringes. A smaller syringe may push too pressure into the line and cause it to break.
- Before each time you flush or put any medicine into the central line, put on non-sterile gloves and scrub the injection cap for 15 seconds with a new chlorhexidine gluconate (CHG) wipe, using friction. Allow to dry for 15 seconds and until completely dry. Do not blow on or fan the area.
- Every time you flush, use the "push-and-pause" method: push a little solution, then pause for 1 to 2 seconds, then push a little more, pause, and so on. This method cleans the inside of the catheter.
- If it is difficult to flush the central line or give medicine through it, do not force it to flush. Call your doctor or home care nurse for help.
|
Quick Steps to Flush:
1. Scrub
2. Flush with normal saline
3. Scrub
4. Flush with heparin, if ordered
5. Clamp central line
|
Steps
- Prepare and clean the work area.
- Wash your hands well.
- Gather supplies:
- non-sterile gloves
- CHG wipes
- normal saline syringe (1 for each lumen)
- heparin syringe (if ordered, 1 for each lumen)
- Check the normal saline and/or heparin syringe labels before giving them.
- Normal saline and heparin syringes are good until the expiration date. Throw it away sooner if you see sediment in it or if you question its cleanliness. If you throw one away be sure to call the home care pharmacy for a replacement.
- Put on non-sterile gloves.
- Prepare pre-filled normal saline syringe(s) by removing the air bubble in them. Remove cap. Hold syringe with tip up. Pull back slightly on the plunger and then push plunger gently squirting the air bubble out. Place cap back on the syringe.
- Scrub injection cap with a CHG wipe for 15 seconds then allow to dry for 15 seconds and until completely dry.
- Attach the normal saline syringe tip into the injection cap.
- Unclamp the catheter.
- Flush with normal saline using the push-and-pause method. When syringe is empty, remove it from the injection cap.
- Scrub injection cap with a CHG wipe for 15 seconds then allow to dry for 15 seconds and until completely dry.
- If heparin is ordered, attach heparin syringe tip into the injection cap and flush using the push-and-pause method. When syringe is empty, remove it from the injection cap.
- Clamp the catheter.
- If the catheter is a double lumen, repeat steps 7-14 for the second lumen. Use new CHG wipes, normal saline and heparin syringes for each lumen.
- Put used syringes and supplies into your regular trash. For syringes with blood, use a special container, such as a hard-plastic bottle with a screw-on lid. Label it, "Do Not Recycle - Household Sharps."
- Do not overfill the sharps container. Disposal varies depending on the area you live in. Some communities have a household sharps collection program. To find out what you should do, check with your garbage collection company, pharmacy, or clinic.
CHANGING THE INJECTION CAP
When do I need to change the injection cap?
To prevent infections, change the injection cap as recommended:
___ 2 times per week if receiving IV fluids, medications, or using the catheter for lab draws
___ every 7 days if not receiving IV fluids, medications*, or using the catheter for lab draws
*Medications do not include daily maintenance flushes of heparin or saline to maintain catheter patency.
How do I change the injection cap?
- Plan to change the cap at a time when you will be flushing the catheter with heparin.
- Prepare and clean work area.
- Wash your hands.
- Gather supplies (may be a kit with all supplies included or you may have to gather individual supplies for each lumen):
- cap change kit (if available) (1 for each lumen). Kit includes:
- CHG wipes
- injection cap
- masks
- sterile gauze
- sterile gloves
- sterile normal saline syringe
- heparin syringe (1 for each lumen)
- Clamp the catheter (each lumen).
- Open kit to masks and sterile gloves.
- Put on mask. Masks should be worn by you, your child, and helper, if present.
- Open the sterile kit completely. Only touch the outside edges to keep the middle section sterile.
- Wash your hands well.
- Put on sterile gloves. After sterile gloves are on, only touch supplies in your sterile kit.
- Prepare injection cap. Attach injection cap to sterile normal saline syringe and point them upward to flush the injection cap and remove air in cap. Leave syringe attached to cap and place syringe/cap on sterile kit
- With your non-dominant hand, use one piece of gauze to pick up the catheter maintaining hand sterility.
- With other hand, use a CHG wipe to scrub the connection site (where the cap joins the catheter) for 15 seconds, using friction. Allow to dry for 15 seconds and until completely dry.
- With your dominant hand, pick up new piece of gauze and use it to unscrew the cap from catheter and remove it. Discard away from sterile supplies.
- Inspect catheter hub threads (grooves).
- If NOT visibly soiled or blood noted, continue onto step 16 and do NOT scrub the catheter hub threads (grooves).
- If visibly soiled or blood noted, with a new CHG wipe scrub the catheter hub threads (grooves) for 15 seconds, using friction. Allow to dry for 15 seconds and until completely dry.
- With dominant hand, pick up sterile normal saline syringe with cap attached. Attach cap to catheter. Leave syringe attached.
- If double lumen, repeat steps 3-16 for second lumen.
- Unclamp the catheter.
- Flush with normal saline using the push-and-pause method. When syringe is empty, remove it from the injection cap.
- Scrub injection cap with a CHG wipe for 15 seconds then allow to dry for 15 seconds and until completely dry.
- If heparin is ordered, attach the heparin syringe tip into the injection cap and flush using the push-and-pause method. When syringe is empty, remove it from the injection cap.
- Clamp the catheter.
- If the catheter is a double lumen, repeat steps 18-22 for the second lumen. Use new CHG wipes, normal saline and heparin syringes for each lumen.
- Put used syringes and supplies into your regular trash. For syringes with blood, use a special container, such as a hard-plastic bottle with a screw-on lid. Label it, "Do Not Recycle - Household Sharps."
- Do not overfill the sharps container. Disposal varies depending on the area you live in. Some communities have a household sharps collection program. To find out what you should do, check with your garbage collection company, pharmacy, or clinic.
Changing the dressing
How often should the dressing be changed?
The dressing over the exit site should be changed once a week (every 7 days), or any time it becomes loose, soiled, or wet.
How do I change the dressing?
- Prepare and clean the work area.
- Wash your hands well.
- Gather supplies:
- chlorhexidine (CHG) applicator
- chlorhexidine (CHG) wipes (2)
- masks (3)
- non-sterile gloves
- saline wipe
- No-string skin prep
- sterile drape
- sterile gauze
- sterile gloves
- Tegaderm® CHG transparent dressing
- Put on non-sterile gloves and mask. Masks should be worn by you, your child and helper, if present.
- Open sterile drape. Only touch the outside edges to keep the middle section sterile.
- Open supplies onto sterile drape without touching any of the items inside the packages or touching the packages to the sterile drape.
- Remove the old dressing by starting at the corners, moving towards the insertion site. Remove the old dressing without pulling on or touching the catheter near the exit site.
- If CHG square is sticking to the line, loosen the edges of the transparent dressing and gently use the normal saline wipe to loosen the CHG square and remove.
- After old dressing is removed, take off non-sterile gloves.
- Wash your hands well.
- Put on sterile gloves. After sterile gloves are on, only touch supplies on your sterile drape.
- Visually check the skin around the exit site for redness, swelling, or drainage.
- Scrub the site with one CHG applicator for 15 seconds, using friction in a back and forth pattern, up and down, sideways, and diagonal pattern. Allow skin to dry for 30 seconds until completely dry. Do not blow on or fan the area.
- Apply no sting skin prep where the edges of the dressing will be. This protects the skin. Allow to dry.
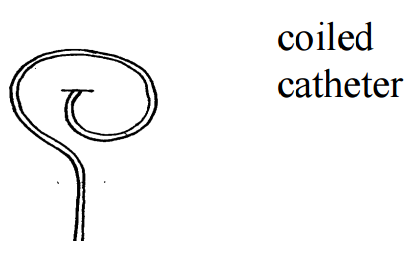
- Coil the catheter if possible. Some catheters cannot be coiled.
- Apply Tegaderm CHG® (with CHG square directly over the exit site of the catheter).
- To further secure the catheter apply additional dressing piece:
- under the catheter at the edge of the transparent dressing.
- Place remaining piece over the catheter on top of the previously place piece of tape.
How do I order supplies?
Your supplies will be ordered from a medical equipment supply company or home care pharmacy. The first order will be delivered to the hospital or your home. Check with your nurse to be sure you have everything you need. You will receive the number to call when you need to order supplies in the future.
Solving problems
| Problem |
Possible cause |
What to do |
- Fever, chills
- Tenderness, redness or pus at the catheter site
|
|
- Check your child's temperature.
- Call the doctor right away.
|
- Trouble flushing the catheter
- Unable to give medicine or fluid into catheter
|
- Catheter may be clamped.
- Catheter or tubing may be kinked.
- Catheter may be blocked by blood build up.
|
- Unclamp it.
- Check for a kink in the line. Remove the kink.
- If the catheter is not kinked or clamped, do not force the solution into the tube. Call the home care nurse to report the problem.
|
- Fluid leaking from the catheter
|
- Injection cap is not screwed on securely.
|
- Tighten the cap.
- If you see a leak in the catheter, clamp it between the damaged area and the skin and call your home care nurse, clinic or emergency room right away.
|
|
|
- Injection cap became loose and fell off
|
- Immediately clamp the line, if open.
- Replace the injection cap using sterile technique and scrub the catheter hub threads with a CHG wipe for 15 seconds and allow to dry for 15 seconds and completely dry before putting on a new injection cap.
|
- Skin redness where the tape or dressing was
|
- Sensitivity to tape or dressing
|
- Call home care nurse.
- You may need to change the dressing size, the type of tape or the type of dressing used.
|
- Catheter accidentally comes out
|
|
- Place a sterile gauze pad on the site and press firmly until the bleeding stops (2 to 5 minutes).
- Call your doctor or home care nurse.
|
Emergency kit
Take a central line emergency kit with you everywhere your child goes. Check the kit before you leave home and replace used items when you return home so it is always ready to go. Supplies include:
- adhesive bandages (Band-Aids™)
- chlorhexidine (CHG) wipes
- clamp
- injection cap
- normal saline syringe
- sterile gauze
- tape
- Tegaderm® dressing
Questions?
If you have any questions, please call:
Home care nurse ______________________________
Supply company ______________________________
Home care pharmacy ______________________________
Doctor ______________________________
Last reviewed 4/2023 by Vascular Access and Home Care
Back To Top
